The Ultimate PACER Guide & Tips
Everyone talks about PACER, but what is it, and how can it help you? I decided to make a quick guide for new users.
PACER is a government-run website to let you view the status and documents related to your bankruptcy (abbreviated BK). PACER is really only useful if you already have a Case number from your attorney, or your social security # if you’re sure your case is filed.
Does it cost money? Yes and No… To perform searches (to find your case, or do searches within your case), it costs $0.08 per page. But, you are only billed if your running total in the quarter is more than $10.00. (If you use $6.80 for example, you are not charged in that quarter.) Lastly, if you download/view a document 30 pages or longer, you are only charged for the first 30 pages ($2.40).
There IS a ‘trick’ to see if there are any updated entries in your case for FREE! I’ll describe it more below, but essentially it works like this: You check your case for the latest update (filing) for free. If there are no updates, you don’t need to click further (and get charged). ONLY click around if you see the case has been updated and pay the 0.08 per page.
How to use PACER:
1) Register for an account:
If you use a credit/debit card when signing up, you get ‘instant’ access (wait a few hours at the most.) Your card will show a (temporary) $1 charge/hold. If you do NOT use a credit/debit card, they’ll mail you a username/password in a week or two.
If you used a debit/credit card, check your email and you’ll be given a ‘link’ to click on. It will take you to a page with your Username/Password. Jot it down somewhere safe.
2) Log in with your Username/Password:
Enter your PACER Login and Password. You can leave the “Client Code” blank. (The Client code is for lawyers to keep track of specific clients. For example, they enter “JohnDoe” or “JackFrost”. Then, they can keep track of all the $$ spent on each client, and they can see the charges broken out by client.) An ‘average’ user probably won’t ever need this unless you want to keep track of more than 1 case and want to keep track of how much $$ you spend on each.
3) Find your U.S. Bankruptcy court in the “Court Links”
When you first log in, it should automatically bring you to the Court Links page. If not, click “Find a Case” (at the top) and “Court Links” (on the left). Look on the right column under “U.S. Bankruptcy Courts” and find where you filed. (Ask your lawyer if you don’t know.) Click on the link for your court, and it should open the local court website.
4) Find “Case Management / Electronic Case Filing (CM/ECF)”
Find the link to get into your court’s CM/ECF portion of their website. This may be tricky to find. Some states list it as “Click here to Login”, or a blue link to “____ District of (Your District) - Document Filing System”.
See a few images of how it looks:


5) Find the ‘Magic Blue Bar’
(...or at least, that’s what I call it!)
If you clicked the right link, it should bring you to a page with a dark blue bar at the top labeled “CM ECF”. It will have “Query” “Reports” “Utilities” Logout” buttons at the top.
See an image of how it looks:

6) QUERY
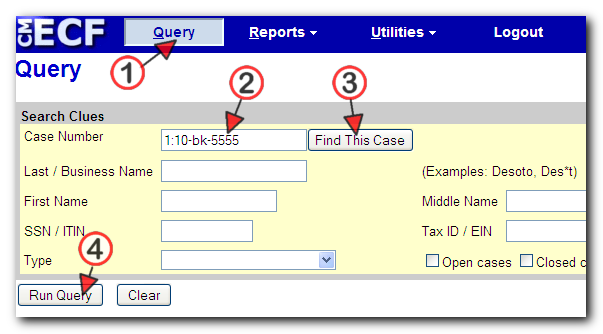
The first thing you’ll do is click the “QUERY” button at the top (see picture). It might be a good idea to BOOKMARK this “QUERY” page in your browser. Each day, you can go to this bookmark/page and check the status. This page NOT cost money.
Enter your Case # and click “Find this Case”. If it’s found, click “Run Query”. (If it is NOT found, make sure your case number is correct, or that you’re on the right US court district. If you’re sure the case # is right and district is correct, then try your Social Security number.)
See an image of how it looks:

7) Your Case Info
This is the page that you can find if your case has been updated. Check the “Date of last filing”. If this is your first time, remember the date listed. The next time you log in, if this date has changed, you know something has been updated. If the date is the same, Logout and close your browser and you won’t be charged. If the date HAS changed, keep reading.
See an image of how it looks:

8) Docket Report…
Assuming your case has changed (or its your first time looking), you can find out what actually changed by clicking the “Docket Report…” will take you to another ‘search’ page. Simply make sure your case # is entered and Run Query. This WILL cost you $0.08 (at least) to view. Once you click it, you’re taken to a long page of information about your case. Scroll down and you’ll see a (growing) table of information. Each entry will be dated with a description of what changed.
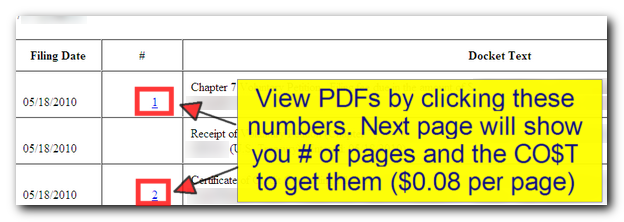
IF your entry has a document associated with it (paperwork filed, etc), then you can download that paperwork as a PDF. (Make sure your computer can display PDF files! Most can if the free Adobe Acrobat Reader is installed.) ($0.08 per page, up to 30 pages or $2.40. Anything above 30 pages in one document is not charged.)
To view/download the document, you click the small blue number link next to the entry. (Not all entries have documents.) By clicking on the number, you are not charged (yet), but the cost and number of pages is displayed. If you’re sure you want to pay for it, click “Get Document” or “Download Document”. Save to your computer if possible, so you won’t ever have to get it again.
See an image of how it looks:

9) Seeing your Billing History
After all this searching, you probably want to know how much you spent, right? Well, simply hover your mouse cursor over the “Utilities” menu. (Hover your mouse for 2-3 seconds and a sub-menu should pop out.) Click “Your Account” and then “Review Billing History”, where you can run a (free) report to see how much you’re being charged.
See an image of how it looks:

Conclusion:
That’s it! You can now join the ‘PACER’ crowd. Now you see why it is so popular! It is a very useful tool once you learn the ropes.
I'll update this guide as I gather more tips. Questions/Suggestions welcome!
Everyone talks about PACER, but what is it, and how can it help you? I decided to make a quick guide for new users.
PACER is a government-run website to let you view the status and documents related to your bankruptcy (abbreviated BK). PACER is really only useful if you already have a Case number from your attorney, or your social security # if you’re sure your case is filed.
Does it cost money? Yes and No… To perform searches (to find your case, or do searches within your case), it costs $0.08 per page. But, you are only billed if your running total in the quarter is more than $10.00. (If you use $6.80 for example, you are not charged in that quarter.) Lastly, if you download/view a document 30 pages or longer, you are only charged for the first 30 pages ($2.40).
There IS a ‘trick’ to see if there are any updated entries in your case for FREE! I’ll describe it more below, but essentially it works like this: You check your case for the latest update (filing) for free. If there are no updates, you don’t need to click further (and get charged). ONLY click around if you see the case has been updated and pay the 0.08 per page.
How to use PACER:
1) Register for an account:
If you use a credit/debit card when signing up, you get ‘instant’ access (wait a few hours at the most.) Your card will show a (temporary) $1 charge/hold. If you do NOT use a credit/debit card, they’ll mail you a username/password in a week or two.
If you used a debit/credit card, check your email and you’ll be given a ‘link’ to click on. It will take you to a page with your Username/Password. Jot it down somewhere safe.
2) Log in with your Username/Password:
Enter your PACER Login and Password. You can leave the “Client Code” blank. (The Client code is for lawyers to keep track of specific clients. For example, they enter “JohnDoe” or “JackFrost”. Then, they can keep track of all the $$ spent on each client, and they can see the charges broken out by client.) An ‘average’ user probably won’t ever need this unless you want to keep track of more than 1 case and want to keep track of how much $$ you spend on each.
3) Find your U.S. Bankruptcy court in the “Court Links”
When you first log in, it should automatically bring you to the Court Links page. If not, click “Find a Case” (at the top) and “Court Links” (on the left). Look on the right column under “U.S. Bankruptcy Courts” and find where you filed. (Ask your lawyer if you don’t know.) Click on the link for your court, and it should open the local court website.
4) Find “Case Management / Electronic Case Filing (CM/ECF)”
Find the link to get into your court’s CM/ECF portion of their website. This may be tricky to find. Some states list it as “Click here to Login”, or a blue link to “____ District of (Your District) - Document Filing System”.
See a few images of how it looks:


5) Find the ‘Magic Blue Bar’
(...or at least, that’s what I call it!)
If you clicked the right link, it should bring you to a page with a dark blue bar at the top labeled “CM ECF”. It will have “Query” “Reports” “Utilities” Logout” buttons at the top.
See an image of how it looks:

6) QUERY
The first thing you’ll do is click the “QUERY” button at the top (see picture). It might be a good idea to BOOKMARK this “QUERY” page in your browser. Each day, you can go to this bookmark/page and check the status. This page NOT cost money.
Enter your Case # and click “Find this Case”. If it’s found, click “Run Query”. (If it is NOT found, make sure your case number is correct, or that you’re on the right US court district. If you’re sure the case # is right and district is correct, then try your Social Security number.)
See an image of how it looks:

7) Your Case Info
This is the page that you can find if your case has been updated. Check the “Date of last filing”. If this is your first time, remember the date listed. The next time you log in, if this date has changed, you know something has been updated. If the date is the same, Logout and close your browser and you won’t be charged. If the date HAS changed, keep reading.
See an image of how it looks:

8) Docket Report…
Assuming your case has changed (or its your first time looking), you can find out what actually changed by clicking the “Docket Report…” will take you to another ‘search’ page. Simply make sure your case # is entered and Run Query. This WILL cost you $0.08 (at least) to view. Once you click it, you’re taken to a long page of information about your case. Scroll down and you’ll see a (growing) table of information. Each entry will be dated with a description of what changed.
IF your entry has a document associated with it (paperwork filed, etc), then you can download that paperwork as a PDF. (Make sure your computer can display PDF files! Most can if the free Adobe Acrobat Reader is installed.) ($0.08 per page, up to 30 pages or $2.40. Anything above 30 pages in one document is not charged.)
To view/download the document, you click the small blue number link next to the entry. (Not all entries have documents.) By clicking on the number, you are not charged (yet), but the cost and number of pages is displayed. If you’re sure you want to pay for it, click “Get Document” or “Download Document”. Save to your computer if possible, so you won’t ever have to get it again.
See an image of how it looks:

9) Seeing your Billing History
After all this searching, you probably want to know how much you spent, right? Well, simply hover your mouse cursor over the “Utilities” menu. (Hover your mouse for 2-3 seconds and a sub-menu should pop out.) Click “Your Account” and then “Review Billing History”, where you can run a (free) report to see how much you’re being charged.
See an image of how it looks:

Conclusion:
That’s it! You can now join the ‘PACER’ crowd. Now you see why it is so popular! It is a very useful tool once you learn the ropes.
I'll update this guide as I gather more tips. Questions/Suggestions welcome!


 Closed November 2010
 Filed March 9, 2010;
  Bankruptcy Wizard


Comment